
Introduction
This document details how to integrate the Controlpad CP24-USBHID and CP48-USBHID programmable keypads with the AutoHotKey keyboard automation and scripting application.
This is a powerful and simple DIY HACK that allows you to control system functions directly.
What is AutoHotKey
AutoHotKey is a Windows system based application that can “REMAP” any existing keyboard code and replace it with a variety of macro strings and system functions. It is important to note that any which is “REMAPPED” will no longer operate as it did before and “ALL” keyboards that are installed on the PC will ALL have that keycode changed.
Example: If AutoHotKey is set-up to “REMAP” the “ESC” key and output the text word “escape” instead, then “ALL” keyboards currently installed will also have the “ESC” key remapped also.
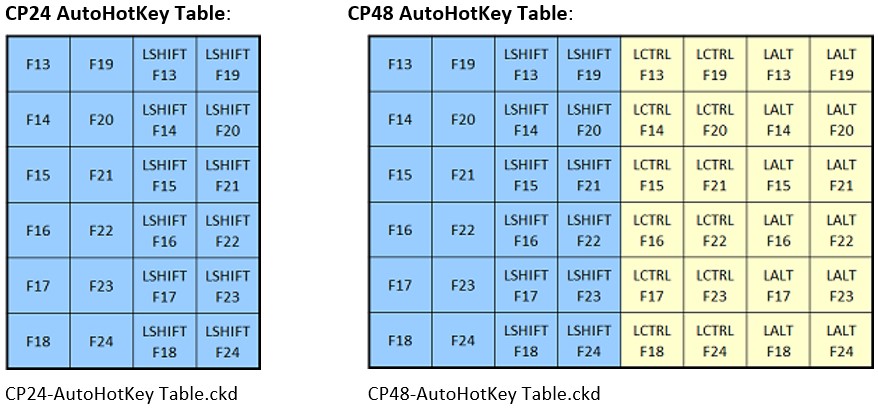
Genovation AutoHotKey Tables
Genovation has developed custom macro tables for both CP24 and CP48 products which use key codes that are normally not used by most PC’s and Windows applications. Most PC keyboards include only (F1 to F12) function keys, however, Windows will accept (F13 to F24) function keys also.
There are two Controlpad table layouts provided which will need to be downloaded to your keypad CP24 or CP48 to start using the Genovation AutoHotKey integration. Below is a screen shot of both tables detailing the codes they will output.
So, the first step is to download and program your CP24 or CP48 keypad with the correct table.
Once you have programmed your CP24 or CP48 keypad with the correct macro table, you are ready to install AutoHotKey and test it.
Installing AutoHotKey
- Go to the AutoHotKey Homepage. https://autohotkey.com/
- Click Download. https://autohotkey.com/download/ahk-install.exe
- During installation of AutoHotKey, you will be asked to choose from UNICODE or ANSI. In short, you would probably want to choose UNICODE. It has support for non-English letters and numbers (characters). Keep going until you see an Install button.
- You’re done!!!
Using the Genovation
AutoHotKey Default Script
Genovation has provided a “Default” AutoHotKey script that is ready to use and already has the custom macro (F13 to F24) key codes remapped for you.
To test the existing default table:
RIGHT-CLICK the file named “CPxx AutoHotKey DEFAULT Table.ahk” and select “Compile Script” as shown to the below.

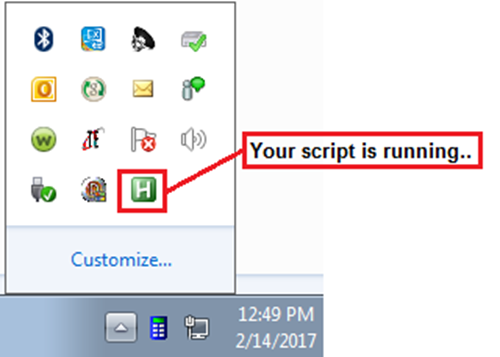
An executable file will be created named “CPxx AutoHotKey DEFAULT Table.exe”. We recommend running these AutoHotKey scripts as an “Administrator” to function properly, so RIGHT-CLICK this executable file and select “Run as administrator”.
Once running, an icon will show up in the Windows system tray indicating that your custom AutoHotKey Script is running.
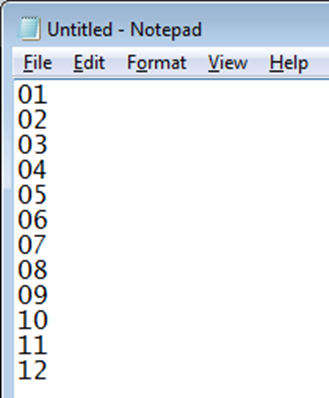
At this point, your Controlpad CP24 or CP48, which was preset to output the (F13 to F24) custom table, is now “REMAPPED” and outputting the Genovation AutoHotKey table instead. If you run Windows “NOTEPAD.EXE”, then test the keys on you keypad, you will find that they now output numbers and an ENTER after. Each key will output its key location number as shown here.
Congratulations, your test works…
Changing the AutoHotKey Script
AutoHotKey is an extremely advanced and versatile application, so we will only demonstrate how to make a few simple changes to the existing script and then provide links to the many AutoHotKey tutorials available online.
First, you will need to STOP the script that we just executed from running so we can make changes and test them.
RIGHT-CLICK the AutoHotKey icon in your system tray and select “Exit” to STOP the script from running.

Editing the AutoHotKey Script:
RIGHT-CLICK the file named “CPxx AutoHotKey DEFAULT Table.ahk” and select “Edit Script” as shown below.

Below is a breakdown of each section within the script describing the formatting.

Now, let’s change the “F13” macro mapping as an experiment.
Replace the text “01” as shown above with the word “hello” instead so that the first line reads as follows.
F13: Send hello {enter} ; Key1
Now, SAVE the file with a NEW FILENAME using the same “AHK” extension, such as “HELLO.AHK” for example. Once saved, now, RIGHT-CLICK that NEW script and select “Compile Script” to create an NEW executable script. Now, RIGHT-CLICK this NEW executable file and select to “Run as administrator”.
Run Windows NOTEPAD.EXE and text KEY1 on the keypad, it should now output “hello” and then ENTER to go to the next line.